Difference: AWEBServer (8 vs. 9)
Revision 92022-11-12 - UliRaich
| Line: 1 to 1 | ||||||||
|---|---|---|---|---|---|---|---|---|
A WEB Server and the HTTP ProtocolExercise 1: Write a Hello World WEB Server | ||||||||
| Line: 14 to 14 | ||||||||
The page seen by the browser will look similar to this:
 | ||||||||
| Deleted: | ||||||||
| < < | Exercise 2: picoweb | |||||||
| Changed: | ||||||||
| < < | Download picoweb and its example programms from gitthub: https://github.com/pfalcon/picoweb. | |||||||
| > > | The following exercises can be done on either the picoweb or the microdot framework. Because of the different calling sequences, the solutions will be a little different, though. Also, picoweb does not offer web socket support and the web socket exercise can therefore not be implemented on picoweb.
Exercise 2: microdot | |||||||
| Changed: | ||||||||
| < < | You can find several tutorials on picoweb on the Internet: You may neglect the chapters on picoweb installation because the MicroPython firmware already contains a copy of picoweb: | |||||||
| > > | Download microdot and its example programs from gitthub: https://duckduckgo.com/?t=ffab&q=microdot+github&ia=web | |||||||
| Changed: | ||||||||
| < < |  | |||||||
| > > | The microdot documentation can be found at https://microdot.readthedocs.io/en/latest/ | |||||||
| For more information on the use of picoweb you will have to study the examples distributed with the github repository or picoweb itself. The examples demonstrate most of picoweb's features. | ||||||||
| Changed: | ||||||||
| < < | Re-write the example from exercise 1 using the picoweb framework. Now the HTML page is separated from the code and must be stored in a separate file. Upload this file to the ESP32 into a folder named html. Create the folder if it does not exist yet. You may also compress the HTML file with gzip and transfer the compressed file to the browser thus limiting the size of the message that must be sent. | |||||||
| > > |
| |||||||
Exercise 3: Provide Measurement Data on the WEB Page | ||||||||
| Changed: | ||||||||
| < < | Modify the WEB server to provide temperature and humidity measured with the SHT30. The easiest way to accomplish this is static text like in the Hello World HTML page into which the measurements can be inserted. This can be done with utemplates | |||||||
| > > | Modify the WEB server to provide temperature and humidity measured with the SHT30. The easiest way to accomplish this is static text, like in the Hello World HTML page, into which the measurements can be inserted. This can be done with utemplates | |||||||
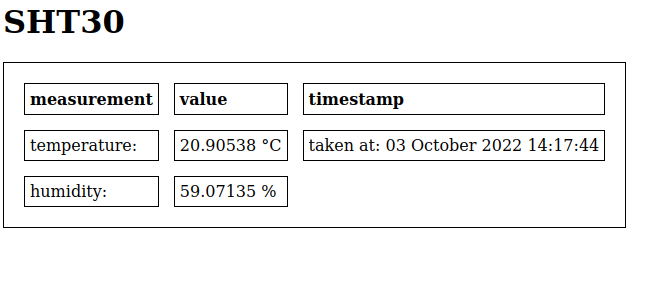
This is how your WEB site for SHT30 measurements might look like (screen dump of the solution script):

Exercise 4: Ajax | ||||||||
| Changed: | ||||||||
| < < | The above exercise has a major flaw: For each measurement you must reload the entire page. It would be much nicer it the WEB page could be updated whenever a new is requested. | |||||||
| > > | The above exercise has a major flaw: For each measurement, you must reload the entire page. It would be much nicer if the WEB page could be updated whenever a new measurement is requested. This can be implemented using AJAX. Now you will need some JavaScript programming to access the AJAX commands. If you have no experience with JavaScript programming and/or AJAX, please go through the following tutorials first:
Using AJAX it is the client (WEB browser) which determines the timing. Please ask for a new measurement every 3-5 s.
To improve your program even further, you can plot the incoming measurements with the Highcharts | |||||||
|
-- | ||||||||
| Line: 49 to 57 | ||||||||
| ||||||||
| Added: | ||||||||
| > > |
| |||||||
View topic | History: r11 < r10 < r9 < r8 | More topic actions...
Ideas, requests, problems regarding TWiki? Send feedback