

Reading the Color Sensor and the Virtual World


COPYRIGHT © 2024 by the contributing authors
Slide 1 of 17
How to create the Virtual World
We have seen the image of

- the ultra-sonic sensor
- the color sensor
- the colored paper
- cylinders
- boxes
- a sphere
COPYRIGHT © 2024 by the contributing authors
Slide 2 of 17
Videos
Some of the examples in the slides are videos captured from the screen.
It is more difficult to insert these into the TWiki pages than into the slides.
I uploaded mpeg video clips and added links such by clicking them
you can download and/or visualize the clips.
COPYRIGHT © 2024 by the contributing authors
Slide 3 of 17
VPython
VPython makes it easy to create and display these 3d objects.
VPython creates the scene in a separate windows and
 and here is the video clip:
https://afnog.iotworkshop.africa/pub/AFNOG/VPythonAndTheVirtualWorld/virtualWorld.mpeg
and here is the video clip:
https://afnog.iotworkshop.africa/pub/AFNOG/VPythonAndTheVirtualWorld/virtualWorld.mpeg
- Lets you move the viewpoint (3rd mouse button)
- Lets you scale the image (2nd mouse button)
and here is the video clip:
https://afnog.iotworkshop.africa/pub/AFNOG/VPythonAndTheVirtualWorld/virtualWorld.mpeg
COPYRIGHT © 2024 by the contributing authors
Slide 4 of 17
VPython Doc
The documentation of VPython explains how to create and change the objects
 You can find it at vpython.org
 Now we will go through a few simple examples which will enable us to assemble the scene.
You can find it at vpython.org
COPYRIGHT © 2024 by the contributing authors
Slide 5 of 17
Create a cylinder


COPYRIGHT © 2024 by the contributing authors
Slide 6 of 17
The FutureWarning
When running the code you will see a warning:
 It turns out that I did not have this problem on my older version of
Raspbian which runs a slightly older version of Python.
It must have appeared only with a very recent Python-2.7 version.
It is only a warning and does not prevent the program from running.
If it annoys you, you have 2 options:
It turns out that I did not have this problem on my older version of
Raspbian which runs a slightly older version of Python.
It must have appeared only with a very recent Python-2.7 version.
It is only a warning and does not prevent the program from running.
If it annoys you, you have 2 options:

It turns out that I did not have this problem on my older version of
Raspbian which runs a slightly older version of Python.
It must have appeared only with a very recent Python-2.7 version.
It is only a warning and does not prevent the program from running.
If it annoys you, you have 2 options: - Correct the code of VPython or
- simply suppress the warning
COPYRIGHT © 2024 by the contributing authors
Slide 7 of 17
Add a sphere


COPYRIGHT © 2024 by the contributing authors
Slide 8 of 17
Change Size and Color
Next we want to make the cylinder longer but slimmer,
change the color of the sphere and make it real small.
 |
 |
COPYRIGHT © 2024 by the contributing authors
Slide 9 of 17
The Virtual Paper Sheet
Finally lets add a virtual paper sheet in form of a very thin (in x-direction) box
simulating the paper sheet:
 |
 |
COPYRIGHT © 2024 by the contributing authors
Slide 10 of 17
Move the paper
Once the static part is done we have to figure out how to move the paper
(depending of the distance of the real paper to the distance detector)
and how to change its color (depending on the color found by the color sensor)
Let's first do this without reading the sensors by just displaying the paper at a certain
position before moving it on and by changing its color and displaying it for a time before
changing it.
and here is the corresponding video clip again:
https://afnog.iotworkshop.africa/pub/AFNOG/VPythonAndTheVirtualWorld/movePaper.mpeg
 |
 |
COPYRIGHT © 2024 by the contributing authors
Slide 11 of 17
Change the Paper Color
 |
|
COPYRIGHT © 2024 by the contributing authors
Slide 12 of 17
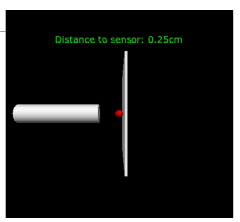
Text in VPython
In our case it might be interesting to print the current distance to the paper in text form.
the video clip shows the result:
https://afnog.iotworkshop.africa/pub/AFNOG/VPythonAndTheVirtualWorldlabel.mpeg
 |
 |
COPYRIGHT © 2024 by the contributing authors
Slide 13 of 17
A model of the distance sensor
This is the model of the ultrasonic distance sensor.
First the blue base plate is creates on which we have 2 cylinders
representing the loudspeaker and the microphone.
On top of each white cylinder I put a very thin black cylinder.
In addition we see the quartz implemented as a box
Understanding this code will allow you to easily create the model of the color sensor.

COPYRIGHT © 2024 by the contributing authors
Slide 14 of 17
Integrating the measurements
To be added:
- Create a pi object connecting our program to the pigpiod daemon
- Create a colorSensor instance
- Create a usSensor instance (us stands for ultra-sonic)
- Calibrate the colorSensor with black and white
- Read the distance sensor
- If the paper is close to the distance sensor, read the color
- Adapt the distance and the color of the model paper
COPYRIGHT © 2024 by the contributing authors
Slide 15 of 17
Color reading only close by
Why do we read the color only when the paper is close to the color sensor?
The color found by the sensor depends on the light intensity
reflected by the paper and this changes with distance
If we measure the color far away from the sensor little light will fall onto the sensor and the color will come out dark.
Therefore put the paper close to the color sensor at first and keep the same color when the paper is moving away from the sensor.
If we measure the color far away from the sensor little light will fall onto the sensor and the color will come out dark.
Therefore put the paper close to the color sensor at first and keep the same color when the paper is moving away from the sensor.
COPYRIGHT © 2024 by the contributing authors
Slide 16 of 17
Time to experiment
Enough lectures, enough talking!
It is time to experiment. Hopefully you now have the information needed to play with
- the Python language
- sensors and actuators
- VPython to create realistic models
- different hardware interfaces
- I2C bus
- SPI bus
- camera interface ....
- and of course you can write your IoT code in a different language
COPYRIGHT © 2024 by the contributing authors
Slide 17 of 17
--
Comments
| I | Attachment | History | Action | Size | Date | Who | Comment |
|---|---|---|---|---|---|---|---|
| |
VPythonDoc.png | r1 | manage | 97.5 K | 2018-04-25 - 17:36 | UliRaich | |
| |
colors.mpeg | r1 | manage | 1244.0 K | 2018-04-25 - 17:37 | UliRaich | |
| |
cylinder-1.png | r1 | manage | 21.6 K | 2018-04-25 - 17:35 | UliRaich | |
| |
cylinder-1Code.png | r1 | manage | 10.1 K | 2018-04-25 - 18:04 | UliRaich | |
| |
cylinderAndSphere.png | r1 | manage | 10.2 K | 2018-04-25 - 17:35 | UliRaich | |
| |
cylinderAndSphereCode.png | r1 | manage | 11.8 K | 2018-04-25 - 18:14 | UliRaich | |
| |
distanceSensorModelCode.png | r1 | manage | 40.4 K | 2018-04-25 - 18:34 | UliRaich | |
| |
futureWarning.png | r1 | manage | 22.4 K | 2018-04-25 - 18:04 | UliRaich | |
| |
label.mpeg | r1 | manage | 864.0 K | 2018-04-25 - 17:38 | UliRaich | |
| |
moveAndResize.png | r1 | manage | 21.5 K | 2018-04-25 - 17:35 | UliRaich | |
| |
movePaper.mpeg | r1 | manage | 612.0 K | 2018-04-25 - 17:39 | UliRaich | |
| |
paperColorCode.png | r1 | manage | 58.5 K | 2018-04-25 - 18:41 | UliRaich | |
| |
paperMove.png | r1 | manage | 2.7 K | 2018-04-25 - 18:29 | UliRaich | |
| |
paperMoveCode.png | r1 | manage | 48.2 K | 2018-04-25 - 18:29 | UliRaich | |
| |
scene-1.png | r1 | manage | 16.4 K | 2018-04-25 - 17:35 | UliRaich | |
| |
sizeAndColor.png | r1 | manage | 6.6 K | 2018-04-25 - 18:18 | UliRaich | |
| |
sizeAndColorCode.png | r1 | manage | 19.9 K | 2018-04-25 - 18:18 | UliRaich | |
| |
suppressWarning.png | r1 | manage | 9.7 K | 2018-04-25 - 18:04 | UliRaich | |
| |
vPythonTextCode.png | r1 | manage | 71.2 K | 2018-04-25 - 18:46 | UliRaich | |
| |
virtualPaper.png | r1 | manage | 7.1 K | 2018-04-25 - 18:21 | UliRaich | |
| |
virtualPaperCode.png | r1 | manage | 29.7 K | 2018-04-25 - 18:21 | UliRaich | |
| |
virtualWorld.mpeg | r1 | manage | 732.0 K | 2018-04-25 - 17:39 | UliRaich | |
| |
vpythonText.png | r1 | manage | 5.1 K | 2018-04-25 - 18:50 | UliRaich | |
| |
vpythonText.png.png | r1 | manage | 5.1 K | 2018-04-25 - 18:46 | UliRaich |
This topic: AFNOG > WebHome > Slides > VPythonAndTheVirtualWorld
Topic revision: r1 - 2018-04-25 - UliRaich
Ideas, requests, problems regarding TWiki? Send feedback