
Slide 1: The 2 Line LCD Display and its HD44780 Controller
The 2 Line LCD Display and its HD44780 Controller
Uli Raich
UCC semester 2017/2018
Slide 2: Why a simple 2 line display?
Often embedded systems do not have a screen, keyboard and mouse associated with them. Small devices in the field may nevertheless need to display some values to the user Small and cheap LCD displays can take over this task Our display can be used for many purposes (see the open day):- Name display
- Weather station
- Voltmeter
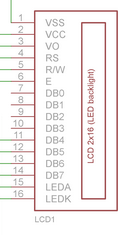
Slide 3: Our Display

Slide 4: Interfacing the display

Slide 5: The PCF8574 I2C interface
The PCF8574 I2C I/O expander allows to limit the number of connection wires to just four.It is a kind of a shift register: serial in, parallel out

Slide 6: Interfacing signals
| The display needs a large number of interface signals to be able to work:
|
 |
Slide 7: Writing the to HD4780 controller via the PCF8574

Slide 8: Writing to PCF8574 via pigpio
Even though it looks complicated at first sight, writing a data byte to the hd44780 controller via the pcf8574 I/O extender is actually pretty simple: After this instruction the 8 data bits of bVal lie at the input of the hd44780 controller.
Slide 9: A data byte to be sent
 We will therefore need a great deal of bit fiddling to
create this data byte and to modify it to
We will therefore need a great deal of bit fiddling to
create this data byte and to modify it to - Set the back light on or off
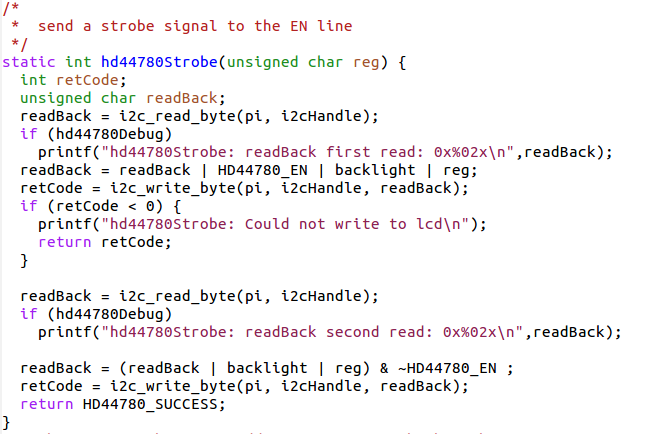
- To send a pulse on the E (strobe) line
- bitwise or operator: |
- bitwise and operator: &
- bit inversion: ~
Slide 10: The HD44780 library
As already explained several times, a library must supply:- The binary code: libhd44780.so
- The include file hd44780.h
Slide 11: The function prototypes

Slide 12: Using the library
In addition to the prototypes, have a look at the doxygenSlide 13: Testing access
Before starting to write the library we must first test if- We can initialize the device ?
- We can write something to it and read it back ?
- Or can we find any other function showing us that the device responds?
Slide 14: Back light
To give us some confidence, lets try to switch the back light on and off:This one is easy as it does not access the hd44780. It does test the PCF8574 though! Switching bit 7 in the data word does the trick. Later we will read a byte from the display and and/or bit seven into the byte read before writing it back.
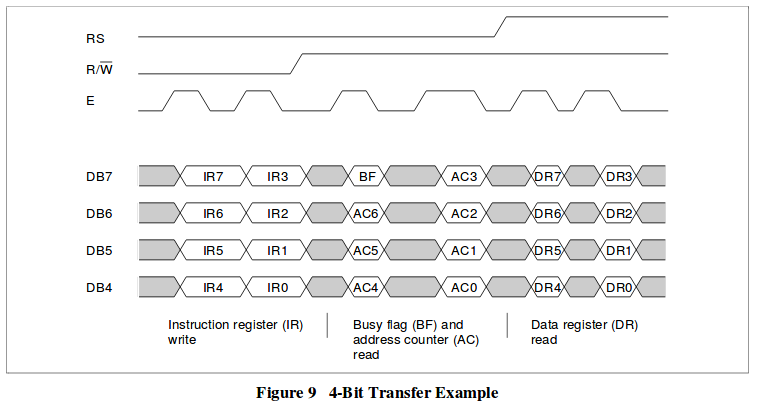
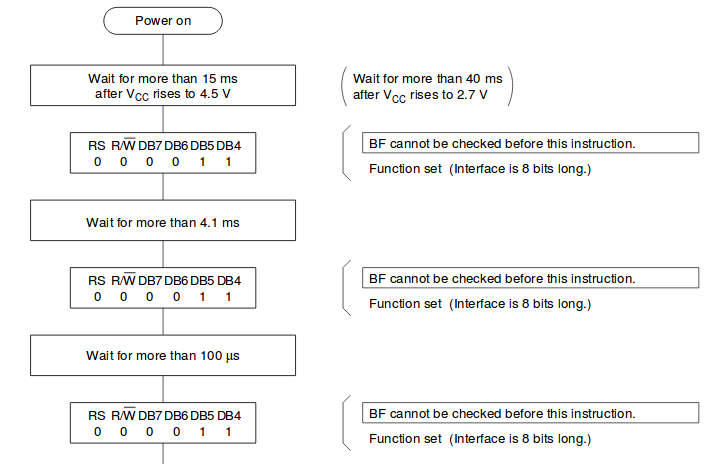
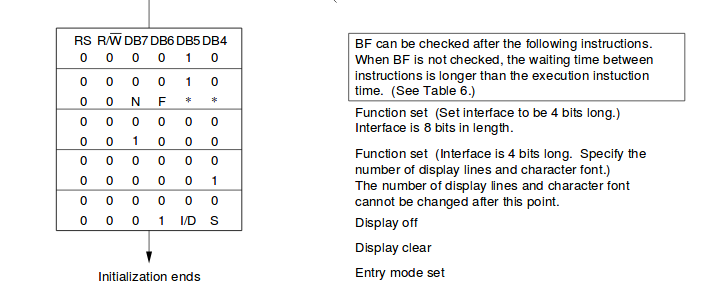
Slide 15: Timing diagrams 4 bit mode
 --
-- Comments


| I | Attachment | History | Action | Size | Date | Who | Comment |
|---|---|---|---|---|---|---|---|
| |
2linedisplay.png | r1 | manage | 873.1 K | 2017-11-06 - 15:33 | UnknownUser | |
| |
4bitTransfer.png | r1 | manage | 24.0 K | 2017-11-06 - 15:33 | UnknownUser | |
| |
4bitdataTransfer.png | r1 | manage | 28.0 K | 2017-11-06 - 15:33 | UnknownUser | |
| |
displaySignals.png | r1 | manage | 16.0 K | 2017-11-06 - 15:33 | UnknownUser | |
| |
i2c_pcf8574.png | r1 | manage | 1014.0 K | 2017-11-06 - 15:33 | UnknownUser | |
| |
i2c_write_byte.png | r1 | manage | 14.9 K | 2017-11-06 - 16:10 | UnknownUser | |
| |
initProc1.png | r1 | manage | 29.9 K | 2017-11-06 - 15:33 | UnknownUser | |
| |
initProc2.png | r1 | manage | 27.7 K | 2017-11-06 - 15:33 | UnknownUser | |
| |
libFunctions.png | r1 | manage | 28.5 K | 2017-11-06 - 15:33 | UnknownUser | |
| |
pcf8574ifce.png | r1 | manage | 63.7 K | 2017-11-06 - 15:33 | UnknownUser | |
| |
pcf8574write.png | r1 | manage | 33.8 K | 2017-11-06 - 16:08 | UnknownUser | |
| |
strobe.png | r1 | manage | 68.3 K | 2017-11-06 - 15:33 | UnknownUser |

|
|
|
|
Ideas, requests, problems regarding TWiki? Send feedback