Tags:
view all tags
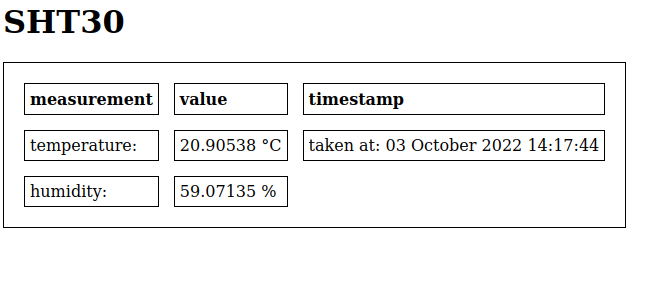
---+ A WEB Server and the HTTP Protocol ---++ Exercise 1: Write a Hello World WEB Server ---++++++ Version 1: Let's start simple and produce a WEB server that simply sends "Hello World!" to the browser when called. In the first version we will create a TCP server creating a stream socket and binding to port 80. <br /><br /> <literal>s=socket.socket(socket.AF_INET,socket.SOCK_STREAM)<br />s.setsockopt(socket.SOL_SOCKET, socket.SO_REUSEADDR, 1) try:<br /> s.bind(('',80))<br />except OSError as exception:<br /> if exception.args[0] == uerrno.EADDRINUSE:<br /> print("Socket is already bound, please reset the machine")<br /> sys.exit()</literal> The server then starts listening for incoming an connection request and establishes a connection by accepting it. <br /><br /> <literal>s.listen(5) print("Starting the Hello World WEB server on IP address ",ipaddr,"port 80")<br />while True: <br /> conn,addr=s.accept() print("GOT a connection from %s" % str(addr))</literal> Finally it reads an http request from the connection and answers with its Hello World page: <br /><br /> <literal> request=conn.recv(1024)<br /> print("Content %s" % str(request))<br /> request=str(request) response=html conn.send(response) conn.close()</literal> _html_ is the http string to be sent. Please check [[https://docs.micropython.org/en/latest/library/usocket.html][https://docs.micropython.org/en/latest/library/usocket.html ]]for more details. ---++++++ Version 2: In the second version we will separate the HTML text from the server and store it in the html directory (to be creatd with ampy) on the ESP32. Now we can use a ready made Web server for !MicroPython, _[[https://github.com/pfalcon/picoweb][picoweb]]_ to serve the page. _picoweb_ and _utemplates_ (see exercise 2) are already included in the !MicroPython binary. ---++++++ Version 3: If we do not use an external SD card, then space for the HTML pages is rather limited. It may therefore be interesting to use gzip compresses pages. Modify your picoweb server to use gzipped HTML. ---++ Exercise 2: Provide Measurement Data on the WEB Page Modify the WEB server to provide temperature and humidity measured with the SHT30. The easiest way to accomplish this is static text like in the Hello World HTML page into which the measurements can be inserted. This can be done with _[[https://github.com/pfalcon/utemplate][utemplates]]_, which are provided by _[[https://github.com/pfalcon/picoweb][picoweb]]_. Have a look in the _utemplates_ README.MD and in the examples directory of picoweb to understand how this is implemented. This is how your WEB site for SHT30 measurements might look like (screen dump of the solution script): <img alt="sht30WebSite.png" height="254" src="%ATTACHURL%/sht30WebSite.png" title="sht30WebSite.png" width="587" /> ---++ Exercise 3: Ajax The above exercise has a major flaw: For each measurement you must reload the entire page. It would be much nicer it the WEB page could be updated whenever a new measurement comes in. -- %USERSIG{UliRaich - 2020-05-27}% ---++ Comments %COMMENT%
Attachments
Attachments
Topic attachments
I
Attachment
History
Action
Size
Date
Who
Comment
png
sht30WebSite.png
r1
manage
15.5 K
2020-05-27 - 19:53
UliRaich
Edit
|
Attach
|
Watch
|
P
rint version
|
H
istory
:
r11
|
r5
<
r4
<
r3
<
r2
|
B
acklinks
|
V
iew topic
|
Raw edit
|
More topic actions...
Topic revision: r3 - 2020-05-27
-
UliRaich
Home
Site map
AFNOG web
Embedded_Systems web
IoT_Course_English web
IoT_Course_French web
Main web
Sandbox web
TWiki web
IoT_Course_English Web
Create New Topic
Index
Search
Changes
Notifications
RSS Feed
Statistics
Preferences
P
View
Raw View
Print version
Find backlinks
History
More topic actions
Edit
Raw edit
Attach file or image
Edit topic preference settings
Set new parent
More topic actions
Account
Log In
Register User
Edit
Attach
Copyright © 2008-2025 by the contributing authors. All material on this collaboration platform is the property of the contributing authors.
Ideas, requests, problems regarding TWiki?
Send feedback


