Accessing Micro Python on the IoT Node
Introduction
Once micro Python is running on the node we must be able to upload Python programs on the node and execute them there. In case of processor board with a micro-USB connector it is easy to connect to the micro Python REPL loop through a simple serial interface and a terminal emulator like
minicom
. In addition you can use
ampy
to up - and download files. A standard editor like
emacs or a specify Python editor like
idle can be used to edit the Python code.
More comfortable though is the use of an IDE like uPyCraft which has editing, up and download features, library functions and a collection of examples built in. uPyCraft can be found as binaries for Windows, Mac and Linux.
When trying to install the
Linux binary 
I got problems with library version incompatibilities on zlib but even when solving this problem the program did not work as expected (the Windows version worked fine). uPyCraft is a Python program whose source is available on github. In fact I found 2 versions:
Even tough I managed to run the program and the main window came up on the screen, most of the functions gave problems. The Qt5 version even more than the Qt4 version. Finally I decided to modify the QT5 version of the program myself and to try correct the errors one be one until the program could be used for the AFNOG workshop. Since the original documentation is also obsolete I re-wrote it for my
new version.
For a description on how to use the program please refer to the github Wiki pages.
Getting the tools to work starting from a freshly installed Ubuntu
Quite a few packages must be installed on Ubuntu before you can use the tools needed. The terminal emulators I installed where
These can easily be installed with apt.
To get the basic configuration ready for minicom, start it with
sudo minicom -s. Use /dev/ttyUSB0 as serial port and set it to 115200 baud. Save this configuration as default.
In order to get the Python programs to work you must first install pip3:
sudo apt install python3-pip
Once you have pip3 running you can install the Python packages needed to run the tools:
sudo pip3 install package name. I had to install the following packages:
PyQt5, pyserial, pyflakes, sip, qscintilla, esptool, thonny
In addition I needed to install python3-tk with apt to have access to tkinter in Python.
Here is the complete list of additional modules I installed with apt:
emacs, vlc,audacity, gimp, git, subversion,mercurial,build-essentials, qtcreator, qt5-default, qt5-doc, qt5-doc-html, qtbase5-doc-html, qtbase5-examples
qt4-dev-tools, qt4-doc, qt4-qt-config, qt4-demos, qt4-designer, libqwt5-qt4 libqwt5-qt4-dev
skype for linux, apache2, gdebi, mysql-server php-mysql
language support for the languages you use (english, german, french, russian in my case)
tkdiff,meld
For IoT we need in addition: MQTTfx (
http://www.jensd.de/apps/mqttfx/1.7.0
) and mosquitto (install with apt)
... and I probably missed quite a few
Accessing micro Python over WiFi
Unfortunately uPyCraft relies on the serial connection between the PC on which it runs and micro Python on the IoT node. When taking the ESP01 off its "programmer" this serial connection will be cut and uPyCraft, in its current state, cannot be used any longer. It is however possible to enable
webrepl on the micro Python node, allowing access to the REPL loop through a
websocket interface.
In order for this to work we first must enable the webrepl server:
Connect the node to the programmer to get access through the serial interface and type
import webrepl-setup
and follow the instructions.
Then install the
webrepl client 
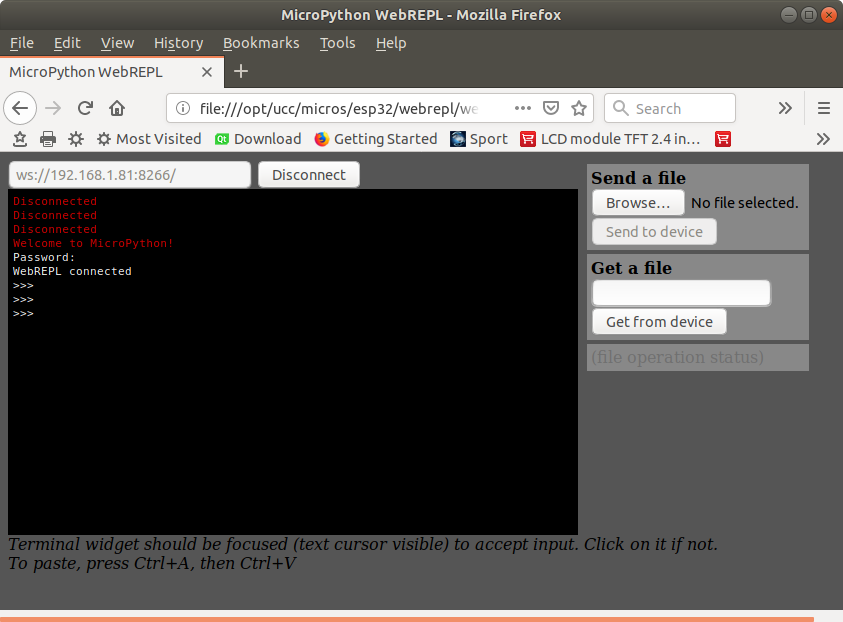
on your PC. Start the browser and enter the URL file://directory_of_webrepl/webrepl.html. In the window coming up enter the websocket server consisting of ws://IP_of_your_IoT_node:8266, where 8266 is the port number. After entering the password you defined during the webrepl_setup step you should get connected to the REPL loop of your micro Python IoT node. For more information please consult the
micro Python tutorial.

As you can see, There are also buttons available to transfer files from and to the IoT node.
--
 Uli Raich - 2019-03-01
Comments
 As you can see, There are also buttons available to transfer files from and to the IoT node.
--


