
Slide 1: Setting up an IoT
Session 3: MQTT and Cayenne
Uli Raich
Formally CERN, Geneva, Switzerland
Slide 2: The Network Layers
The WeMos D1 mini has a built-in WiFi interfaceIn order to communicate with other IoT nodes we must therefore connect to the WiFi network first
On top of WiFi we will run a TCP session
On top of TCP we will run the MQTT protocol
On top of MQTT we have dedicated topics and payloads imposed by Cayenne
Slide 3: Accessing the WiFi network

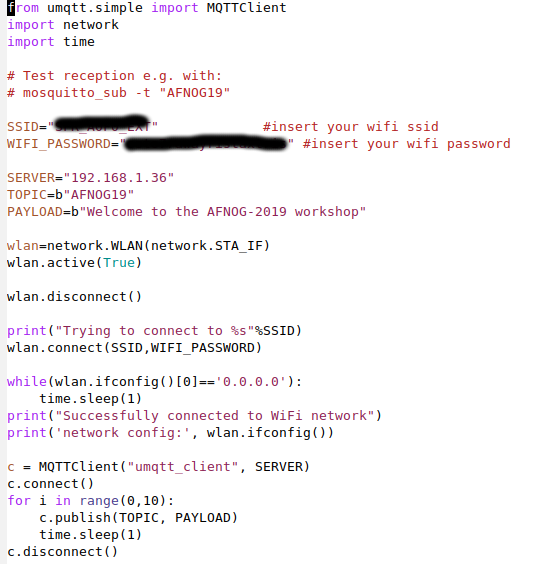
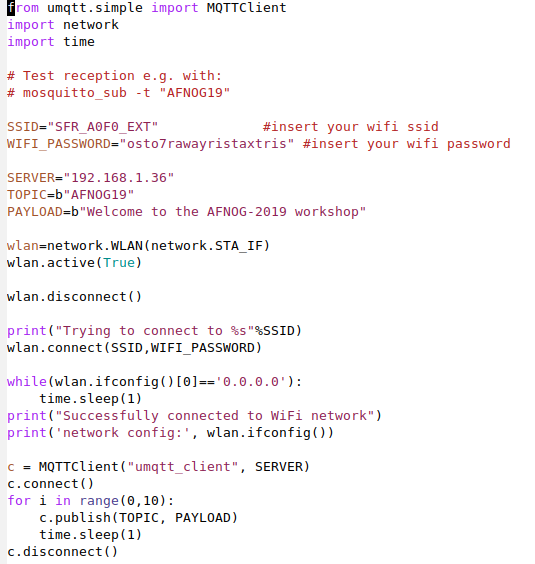
Slide 4: Accessing the WiFi network from Micropython

Slide 5: MQTT
MQTT (Message Queuing Telemetry Transport: a publish-subscribe basedmessage protocol running of top of TCP.
A processor can subscribe to messages of a certain topic and/or it can push its
results on a certain topic

Slide 6: MQTT Demo

Slide 7: The Micropython library

Slide 8: A MQTT example using umqtt.simple

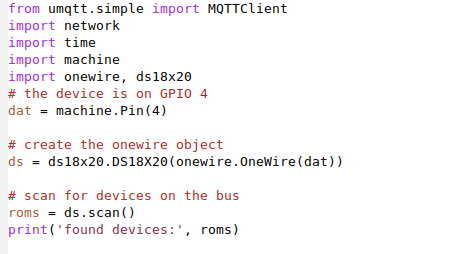
Slide 9: Sending dummy temperature data

Slide 10: Receiving commands
Receiving commands is a bit more tricky! We must:- Write a callback function and register it with the MQTT client
- This function takes 2 arguments:
- The topic
- The payload
- Subscribe to the topic
- Wait forever. The callback function will be executed when a message with the
topic we subscribed to, will arrive
Slide 11: Subscribe a callback

Slide 12: Callback result

Slide 13: Controlling a LED
In order to control a LED through MQTT we now simply interpret the payload:- Message LED on
- Message LED off
Slide 14: Changed Callback

Slide 15: Missing functions in IoT
- MQTT broker should be globally reachable
- GUI to easily visualize sensor measurements
- GUI elements to easily control actuators
- GUI should be accessible through a WEB interface
- GUI should be accessible through smart phone app
Slide 16: Cayenne functionality
- MQTT broker is accessible at mqtt.mydevices.com
- Supplies GUI

Slide 17: Signing up for Cayenne
Sign up athttps://mydevices.com/cayenne/signup

Slide 18: Cayenne Start

Slide 19: Cayenne Doc
You find the documentation at https://mydevices.com/cayenne/docs/intro
Slide 20: Installing Cayenne on the Raspberry PI

Slide 21: Installing Cayenne on the Raspberry Pi manually

Slide 22: Register your Controller Single Board Computers

Slide 23: Run Cayenne on the Arduino

Slide 24: Basic Arduino Sketch for the Arduino

Slide 25: Cayenne Credentials

Slide 26: Cayenne network layers
 The Cayenne credentials are integrated into the MQTT topic string
Value and units are integrated into the payload string
Slide 27: Cayenne and Python
This falls under bring your own thing !Having a look at the Arduino sketch you can see that it uses the
Arduino Cayenne C++ library.
Cayenne MQTT libraries are available in
- C, C++
- Python
- Java
Slide 28: Cayenne and Micropython
The Python Cayenne Client library depends on the Eclipse Paho MQTT libraryMicropython uses its own, stripped down umqtt (micro mqtt) library such that the standard Cayenne Client does not work on Micropython
but
The Python Cayenne Client is Open Source and can be adapted to umqtt, which is what I did for you. The adapted Client library uses the same API as the original one, which means that the example programs work unchanged.
Slide 29: The Cayenne Client
When creating a Cayenne Client Class it- Initializes its internal variables
- Checks if the OLED display is connected and if yes, initializes it
- The Cayenne Client has has a begin method which
- Connects to WiFi
- Connects to the Cayenne MQTT broker at mqtt.mydevices.com
- Subscribes to commands send by Cayenne
- Displays its internal state on the OLED display
Slide 30: The code to connect to Cayenne

Slide 31: Connecting to Cayenne

Slide 32: The empty Cayenne dashboard
 --
-- Comments


| I | Attachment | History | Action | Size | Date | Who | Comment |
|---|---|---|---|---|---|---|---|
| |
afnog19-ws-session3.odp | r1 | manage | 5245.0 K | 2019-05-15 - 19:13 | UliRaich | |
| |
callbackResult.png | r1 | manage | 142.7 K | 2019-05-22 - 12:31 | UliRaich | |
| |
cayenneArduinoInstall.png | r1 | manage | 128.4 K | 2019-05-22 - 16:32 | UliRaich | |
| |
cayenneArduinoSketch.png | r1 | manage | 191.2 K | 2019-05-22 - 16:35 | UliRaich | |
| |
cayenneConnect.png | r1 | manage | 137.9 K | 2019-05-22 - 16:52 | UliRaich | |
| |
cayenneConnectCode.png | r1 | manage | 56.8 K | 2019-05-22 - 16:52 | UliRaich | |
| |
cayenneCredentials.png | r1 | manage | 109.7 K | 2019-05-22 - 16:36 | UliRaich | |
| |
cayenneDoc.png | r1 | manage | 158.3 K | 2019-05-22 - 16:21 | UliRaich | |
| |
cayenneEmptyDashboard.png | r1 | manage | 150.2 K | 2019-05-22 - 16:52 | UliRaich | |
| |
cayenneFunctionality.png | r1 | manage | 135.7 K | 2019-05-22 - 16:09 | UliRaich | |
| |
cayenneNetLayers.png | r1 | manage | 34.5 K | 2019-05-22 - 16:45 | UliRaich | |
| |
cayenneRPI.png | r1 | manage | 150.8 K | 2019-05-22 - 16:24 | UliRaich | |
| |
cayenneRegisterRPI.png | r1 | manage | 148.3 K | 2019-05-22 - 16:24 | UliRaich | |
| |
cayenneSignup.png | r1 | manage | 122.2 K | 2019-05-22 - 16:15 | UliRaich | |
| |
cayenneStart.png | r1 | manage | 146.3 K | 2019-05-22 - 16:15 | UliRaich | |
| |
cayenne_RPI_ManualInstallation.png | r1 | manage | 189.9 K | 2019-05-22 - 16:30 | UliRaich | |
| |
changedCallback.png | r1 | manage | 15.3 K | 2019-05-22 - 16:06 | UliRaich | |
| |
micropython-lib.png | r1 | manage | 75.2 K | 2019-05-14 - 17:31 | UliRaich | |
| |
mqttDemo.png | r1 | manage | 191.3 K | 2019-05-14 - 17:23 | UliRaich | |
| |
mqttDummySensorDemo.png | r1 | manage | 74.4 K | 2019-05-20 - 18:40 | UliRaich | |
| |
mqttExample.png | r2 r1 | manage | 73.2 K | 2019-05-15 - 16:12 | UliRaich | |
| |
mqttPostOfffice.png | r1 | manage | 50.2 K | 2019-05-14 - 17:18 | UliRaich | |
| |
realData.png | r1 | manage | 27.7 K | 2019-05-15 - 17:12 | UliRaich | |
| |
subscribeDemo.png | r1 | manage | 78.3 K | 2019-05-20 - 18:45 | UliRaich | |
| |
umqttDemo.png | r2 r1 | manage | 72.2 K | 2019-05-14 - 17:38 | UliRaich | |
| |
wifiConnect.png | r1 | manage | 128.4 K | 2019-05-14 - 17:18 | UliRaich | |
| |
wifiDemoCode.png | r1 | manage | 43.8 K | 2019-05-15 - 16:14 | UliRaich |

Ideas, requests, problems regarding TWiki? Send feedback