
Slide 1: Development Tools: Editor, Compiler, Linker, Debugger, Make
Uli Raich
First Semester 2017/2018
Slide 2: The development cycle
The first and most important part in the development cycle is that you think! Of course a hello world program you can start implementing immediately. This however is not the case for real world problems. Break down the problem into small manageable parts that you can implement and test individually Think about how these smaller pieces will be interfaced with each other to create the full program Make a design on paper or use one of the software design tools.Slide 3: The editor
There are plenty of editors on Linux:- vi: the first and traditional full screen editor
this one is for die-hard Unix gurus but on some very small
Unix system it is the only editor installed - emacs: another traditional Unix editor
(and my favorite, probably because I know it best).
The advantage of using emacs is that the key sequences used
for editing are also understood by bash. This is also the favorite of many programmers.
People say it can do everything except making coffee.
Slide 4: More Editors
- gedit: the editor that comes with the Gnome desktop
- joe, jed, nano, ed …
- eclipse: originally developed for Java but has “perspectives” for other languages like C, C++
- qtcreator: an IDE tailored to development of window based Qt programs. Mainly C++
- netbeans: tailored to Java but can also do C/C++
Slide 5: Linking several object files
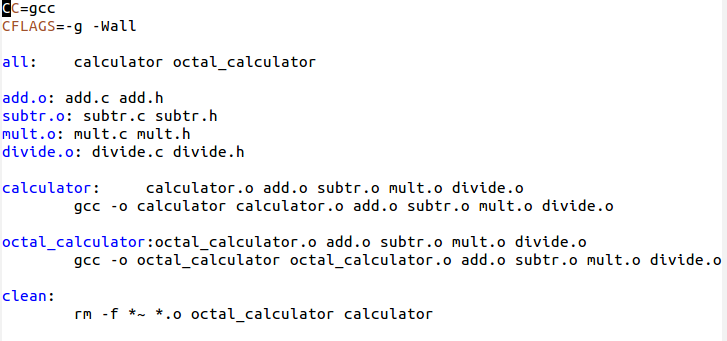
We have seen that functions can be implemented in dedicated files. In our calculator, each operation can be implemented in a separate function on a separate file. We then have to compile 5 C programs to object files and finally link these into the final executable. The C library is automatically linked as well but we may also need to link additional libraries (e.g. libm.so the math library).Slide 6: emacs
emacs is written in lisp. It has so many functionalities that I have no chance to show all during the lectures. I will give a little demo but you will not be able to remember all the key sequences even until this afternoon for the exercises However, many functions are accessible through pull-down menus and the key sequences are given Emacs has an online tutorial, which you should have a look at.Slide 7: emacs example
emacs when editing "hello world"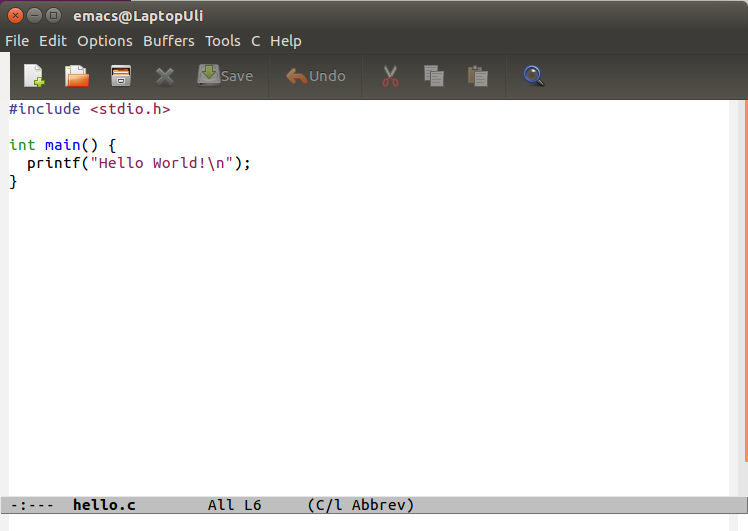
Slide 8: A more elaborated emacs session
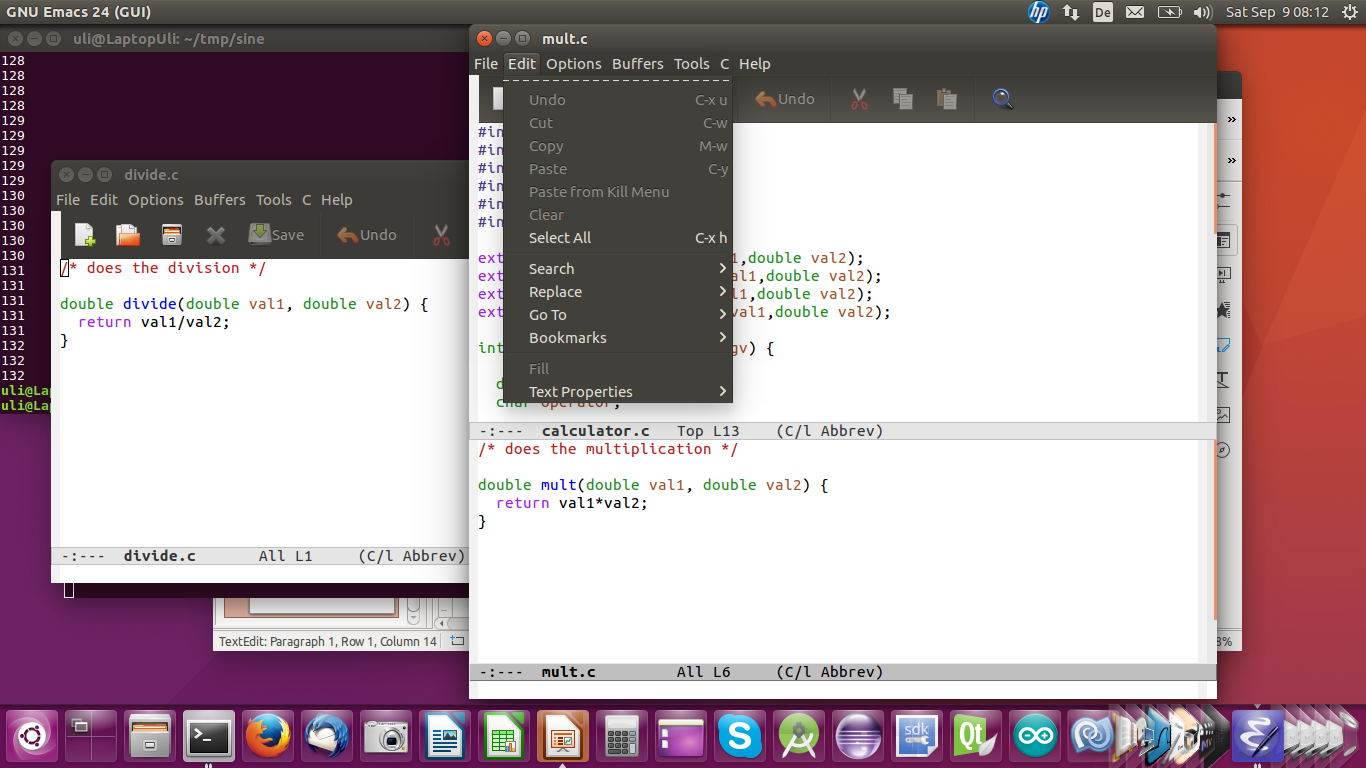
Slide 9: Demo on emacs
!!! Interruption !!!
You want to know how to really use emacs to its full potential? Get the manual (some 635 pages!)Slide 10: gcc
gcc is the de facto industry standard C compiler It exists for many different machines- Intel processors
- ARM MIPS
- And it comes as native or as cross compiler
Slide 11: gcc components
gcc has several components:- The preprocessor
this treats the #define and #include statements to
build a complete C source file for the compiler - The C compiler proper
- The assembler
- The Linker
Slide 12: gcc options
gcc has plenty of options which may also depend on the compiler version. gcc for ARM has different options from gcc for Intel. Here are just a few of them:- -Wall
don’t ignore any warnings. You may however also specify which
type of warnings you are interested in - -g keep symbol table for debugging
- -E only run the preprocessor
- -S create assembly code and stop
- -c compile into object code, don't link
Slide 13: gcc input and output
Gcc input can be any of the following:- C source code: myCode.c
- Assembly code: myCode.s
- Object code: myCode.o
- Libraries: libmylibrary.a or libmylibrary.so
Slide 14: make
We have seen that quite a few gcc commands may be needed even if we only build a ridiculously small program as our calculator What about a program with thousands of source files? We need a tool with which we can describe how to build the program and which will execute all necessary steps automatically:make
Slide 15: The Makefile
Traditionally the description is called Makefile (with capital M) even though any other name will do as well The Makefile contains- Macros (similar to Variables)
- Dependencies
- targets
Slide 16: An example Makefile
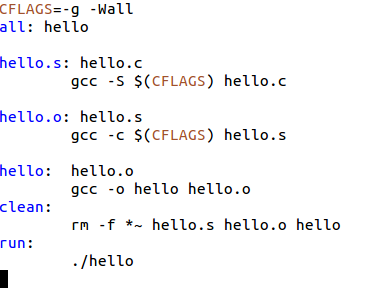
Slide 17: Targets and dependencies
The target is the thing that is to be done in this step: hello: hello.c hello.h In this case hello is the target and it depends on hello.c and hello.h Then you have the action needed to create the target which has a tab character (invisible!) before the text: Tab $(CC) $(CFLAGS) -o hello hello.c This will compile and link output the hello executableSlide 18: A simpler Makefile
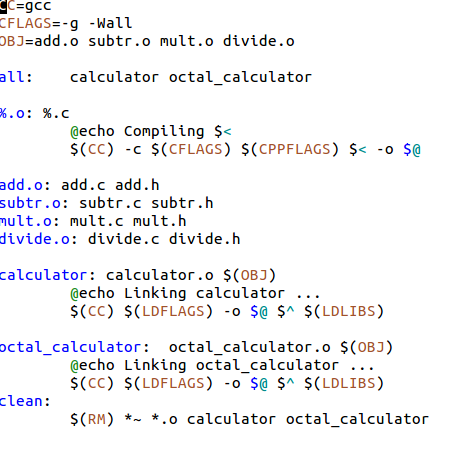
Make has predefined rules and it knows hot to produce a .o file from a .c file We can therefore restrict out Makefile to this: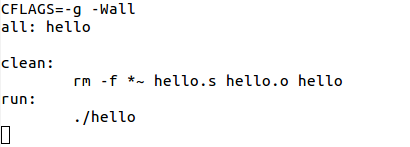
Slide 19: Special macros
- CC is the C compiler, it defaults to cc
- CFLAGS are the flags to be passed to the C compiler
- LDFLAGS are the flags to be passed to the linker
- LDLIBS are the libraries to be linked into the executable
- RM translates into rm -f
- $< is the file that caused the action
- $* is the prefix shared by target and dependent file
- $@ is the file to be made
- $? are the dependent files that have changed
- $^ are all dependent files
Slide 20: more Makefile examples
%.o: %.c: $(CC) $(CFLAGS) -c $< Or $(CC) $(CFLAGS) -c $*.cSlide 21: Makefile with several object files to be linked
Slide 22: Makefile improved
Slide 23: know more about make?
You want to know more about make? There are several tutorials on the WEB There is also the official manual which is a 200 pages book!Slide 24: Running the program
To run the program we have to run ./nameOfBinary Why do you have ./ before the program name and what does it mean? Is there a means to run the program without the ./ ? Beginner programmers often think that the job is done once the program is compiled and all the syntax errors fixed. The truth is that then the work has just justed. Often there are programming errors (bugs) in the logic and the program mis-behaves. How do we spot these errors?Slide 25: Printing debug information
Very often programmers put print statements purely for the sake of debugging. This is annoying when running the final program where this information should not be needed any more. One easy way out of the dilemma is given by the C preprocessor: #define DEBUG 1 #ifdef DEBUG p rintf(“printing some variable contents %d\n”,variable); #endif Commenting out the #define statement will get rid of all debugging prints.Slide 26: The debugger gdb
Sometimes printing debug information is not enough and we have to use a debugger. gdb the GNU debugger is still the standard tool Compile your program with the -g option to retain the symbol table Then run the program within the debugger gdb yourProgramSlide 27: Using gdb
- break: set a breakpoint to stop running when arriving at this point
- run: start the program
- continue: continue running after a breakpoint
- next: execute the program line next line
- step: step into the function if the next line is a function call
- list: print the source code at the current position in the program
- bt: backtrace, show the program stack
- print: print a variable
Comments
| I | Attachment | History | Action | Size | Date | Who | Comment |
|---|---|---|---|---|---|---|---|
| |
complexMakefile.png | r1 | manage | 27.5 K | 2017-09-11 - 12:26 | UnknownUser | |
| |
emacs-1.png | r1 | manage | 34.1 K | 2017-09-11 - 11:27 | UnknownUser | |
| |
emacs-2.png | r1 | manage | 299.7 K | 2017-09-11 - 11:27 | UnknownUser | |
| |
helloMakefile.png | r1 | manage | 16.4 K | 2017-09-11 - 11:42 | UnknownUser | |
| |
improvedMakefile.png | r1 | manage | 38.3 K | 2017-09-11 - 11:42 | UnknownUser | |
| |
lecture_4.odp | r1 | manage | 447.3 K | 2017-10-16 - 12:40 | UnknownUser | |
| |
makeExamples.tar.gz | r1 | manage | 1.7 K | 2017-10-16 - 18:44 | UnknownUser | |
| |
simpleMakefile.png | r1 | manage | 6.6 K | 2017-09-11 - 11:48 | UnknownUser |
Topic revision: r6 - 2018-10-04 - IsaacArmahMensah
Ideas, requests, problems regarding TWiki? Send feedback


