
Slide 1: The Raspberry Pi and how to bring it to life
Lecture 6
Uli Raich
UCC semester 2017/2018
Slide 2: A first glimpse
There are several versions of Raspberry Pis available on the market:- Raspberry Pi 1 Model B released in 2012
- There is also a simpler and cheaper model A
- Raspberry 2 with more memory
- Raspberry Pi zero a stripped down version for 5 US$
- Raspberry Pi zero W same as zero but with WiFi and Bluetooth for 10 US$
- Raspberry Pi 3 fully equipped model that we will be using
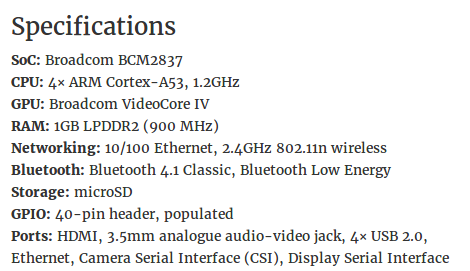
Slide 3: Raspberry Pi specs
Slide 4: Operating systems on the Pi
From the specs we can see that the Raspberry Pi 3 is a full blown computer.With its
- 64 bit quad core processor
- 1 Gbyte of RAM
- 32 Gbyte of SD card
Slide 5: Currently available OS
- Raspbian, a Debian variant of Linux tailored to the Raspberry Pi.
- It contains most of the software packages you also find on Ubuntu
The Desktop is however stripped down to make it more
responsive on a processor that cannot cope with the speed of a PC
This is what we are using! - Ubuntu Mate is a Ubuntu variant for the Pi
- Windows 10 IOT core, a windows variant. I have never tried this but
Windows gurus may give it a try if they cannot live without Windows on the Pi - Android: There are several Android versions for the Pi floating
around on the WEB. Your success on these may vary - Kodi is a multimedia server that will allow you to listen to music,
look at photos or watch films. Connect your Pi to a TV set
(through the HDMI connector) and a stereo and off you go!
Slide 6: BCM2835 CPU
The CPU has got an ARM processor core with 4 64 bit CPUs The operating system and the Linux kernel are still 32 bit versions (After the course you may try to compile and install a 64 bit kernel yourself. This is a very good exercise to understand how the OS is built!) Around the CPU there are plenty of interfaces To know the details (the interfaces only!) have a look at the data sheet explaining them (205 pages!)Slide 7: BCM2835 peripherals
Here are some of the Raspberry Pi peripherals:- UART
- SPI
- BSC (serial controller)
- DMA controller
- External mass media controller
- PCM / I2S Audio
- Pulse Width Modulation
- Timer
- USB
- I2C
- GPIO
Slide 8: Raspberry Pi and the real world
You can easily connect- General Purpose Input Output signals
- These are 3.3 V single pin signals used e.g. to drive a LED,
a relay or any other device needing a digital signal level - You can program it input or output
- With pull-ups or pull-downs
- To read switch state
- To drive a 3.3V output level (and light a LED)
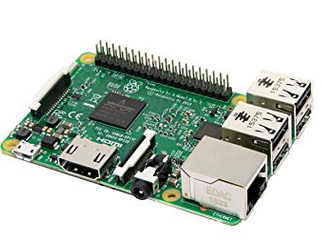
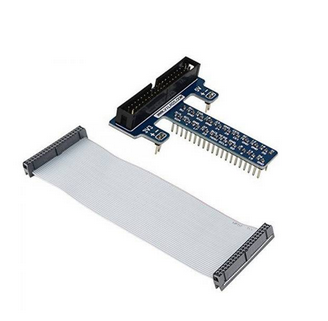
Slide 9: Connection to bread board: The cobbler
 |
 |
Slide 10: Other RPI connections
I2C is a serial bus often used in computer systems of for short distance interfacing. Many devices having a I2C port are available and we will program a few:- ADC
- DAC
- Real time clock
- EEPROM
- BPM180 barometric pressure sensor
- We also have a 2-line LCD display needing some 8 signals
(+ power and gnd). A serial to parallel interface (shift register)
with I2C interface eases the connection to the Raspberry Pi
as only 4 serial signal lines are needed: SDA, SCL, Vcc, Gnd
Slide 11: More interfaces
There are more interfaces which we will not necessarily use during the course. Students who think that they do not learn enough during this course are invited to come forward. We can easily give you more exercises, e.g to make- The camera
- The touch screen interface
- The audio system
- Or the video system work
Slide 12: What you need to bring a RPI to life
This is what you will need to bring a Raspberry Pi to life:- The Raspberry Pi board
- A case (this increases the chances the Pi will survive for more than a week)
- A 5V, 2.5A power supply with micro USB connector
- A USB keyboard and USB mouse
- A screen with HDMI connection of HDMI to VGA adapter
Slide 13: The software
Go to the Raspberry Pi download page and download the Raspbian image. It comes in 2 versions- NOOBS which contains the system itself + an installer
- Raspbian proper. This version may be slightly more difficult to install
because it does not have the installer, which you would keep on your
SD card even though after its first use you donít need it any more
Slide 14: How to extract the file system on Ubuntu?
Once downloaded we must first unzip the file: Create a folder /opt/ucc/micros/raspberry and copy the zip file into it cd /opt/ucc/micros/raspberry cp ~/Downloads/2017-09-07-raspbian-stretch.zip . unzip 2017-09-07-raspbian-stretch.zip which will give you 2017-09-07-raspbian-stretch.img This is the file system image which will be copied to the SD card bit by bit using the dd commandSlide 15: Structure of the image file
Can we know what is inside this image? We see that there are 2 disk partitions:
 - a FAT32 (Windows type) partition. This is the boot partition
- a Linux (ext4) partition which is the root file system
Slide 16: Looking inside the partitions
This is something only root (the superuser) can do We loop mount the file system: Now we can copy the contents to whatever directory we want
This is the boot partition
Then we can do the same thing for the root partition
Slide 17: The root partition
Once we mount the second partition the same way we see that it contains: something we have seen before on our Ubuntu PC
The boot partition we have seen before is mounted on
/boot in this partition
Slide 18: How to get the OS onto the Raspberry Pi?
Now we have the OS on the PC where it does not help us much! We must put it onto a media that can be read by the Rpi. Traditionally this was the micro SD card but you can also use certain types of USB memory sticks (Be careful, not all sticks will work! I use a SanDisk cruzer)Slide 19: Copying the OS to the SD card
If your PC has an SD card reader then you put the micro SD card into a normal SD card holder. Otherwise there are microSD to USB converters First check which disks you have on you system:Slide 20: Copy the OS
Now we are ready to copy the operating system to the SD card (or USB stick)Where X is the disk letter (in our case ďcĒ) This may well take several minutes (the image is some 1.6 Gbytes!) To see the progress:
Slide 21: The moment of truth
Safely remove the SD card from your system (unmount if mounted!) Put it into the SD card slot of the Pi Power on th machine With a little bit of luck, it should boot For more details of installing Raspbian on the SD card using a Linux system seehttps://www.raspberrypi.org/documentation/installation/installing-images/linux.md
Slide 22: First login
Raspbian has a default user named- pi
- with password raspberry (which must be changed
immediately for security reasons!)
Slide 23: Adding software packages
Once you have come this far you may want to add additional software packages, emacs being one of them You will continue adding packages as you use the system and you will see what is missing.Slide 24: Configuring the system
We have seen that the system image takes 1.6 Gbytes our SD card however provides 32 Gbytes. How to use it to its full capacity? Start raspi-config (which is a program dedicated to the Raspberry and does not exists und PC Ubuntu) Go through all the options of the program and see if they make sense to you.
Slide 25: Accessing the RPI remotely
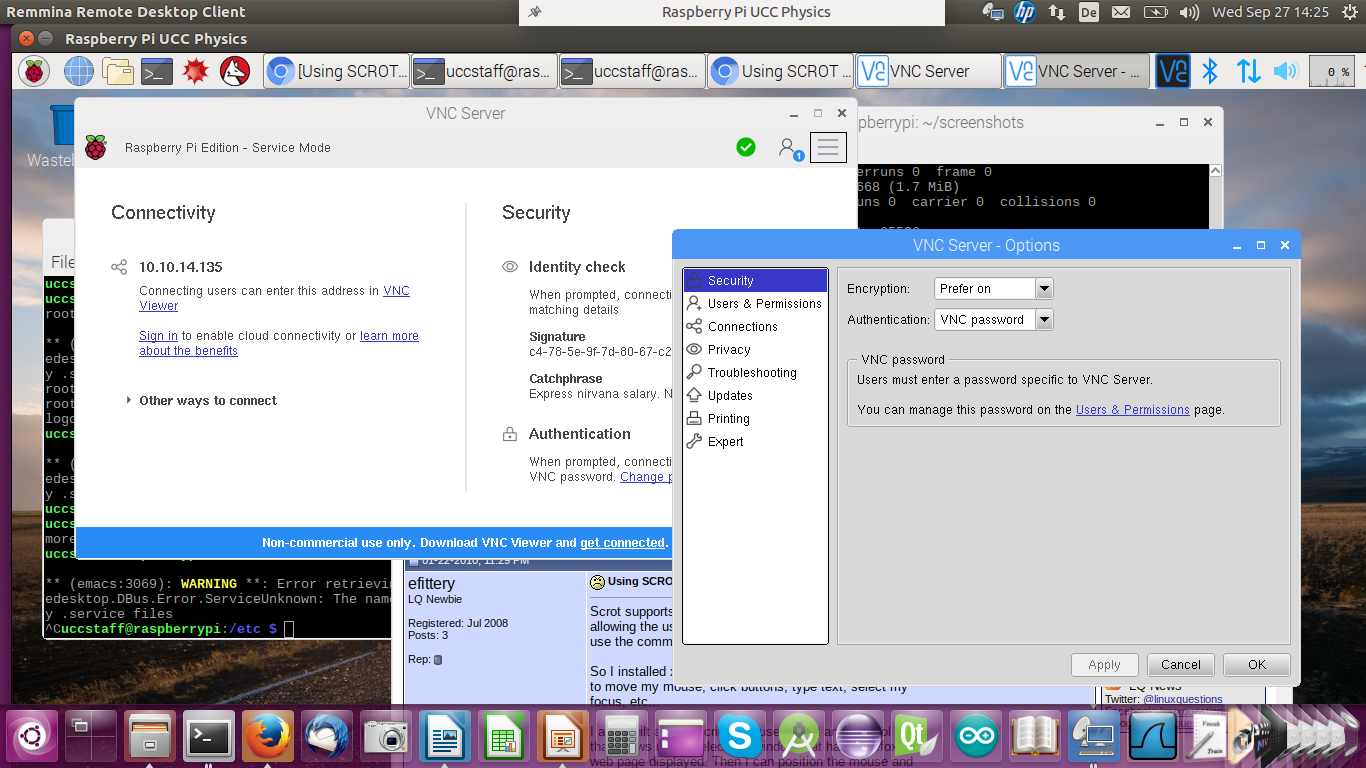
Of course we can use the interfaces on the Raspberry Pi to connect a screen, keyboard and mouse and use it in stand-alone mode but we can also make use of the PC resources and access it remotely There are several ways to access the RPI remotely:- Using the VNC server on the Pi you can access it
with a remote desktop from the PC - The secure shell (ssh) allows you to get a remote terminal in the Pi
- With scp you can copy files back and forth between the Pi and the PC
- With nfs you can mount part of the Pi file system into the
PC file system tree and access the PI SD card as if it was a local PC disk.
Slide 26: The remote Desktop
Slide 27: Remote Desktop (2)
When running the remote desktop you are working on the Raspberry Pi with the screen, keyboard and mouse replaced by the devices on the PC. You have the same functionality as if the screen was connected to the Piís HDMI port and keyboard and mouse were connected to the USB ports on the Pi.Slide 28: nfs the network file system
With nfs you can mount part of the Piís file system tree onto your PC file system. This allows you access to the Piís files as if you were using a local disk. You cannot run any Rasberry Pi programs this way however. It is interesting if you cross-compile Pi programs on your PC, which will be immediately visible on the Pi.Slide 29: ssh the secure shell
In the case of ssh you have a single terminal window that is connected to a shell on the Pi. The command is: ssh userOnPi@piIPaddress Where piIPaddress can be the Piís IP address of hostname. If you specify the -X option you can run X-11 based programs where the X protocol is run over the ssh connection.Slide 30: ssh session example
Here you see a screen dump from the PC with a remote terminal that started an emacs session on the Pi.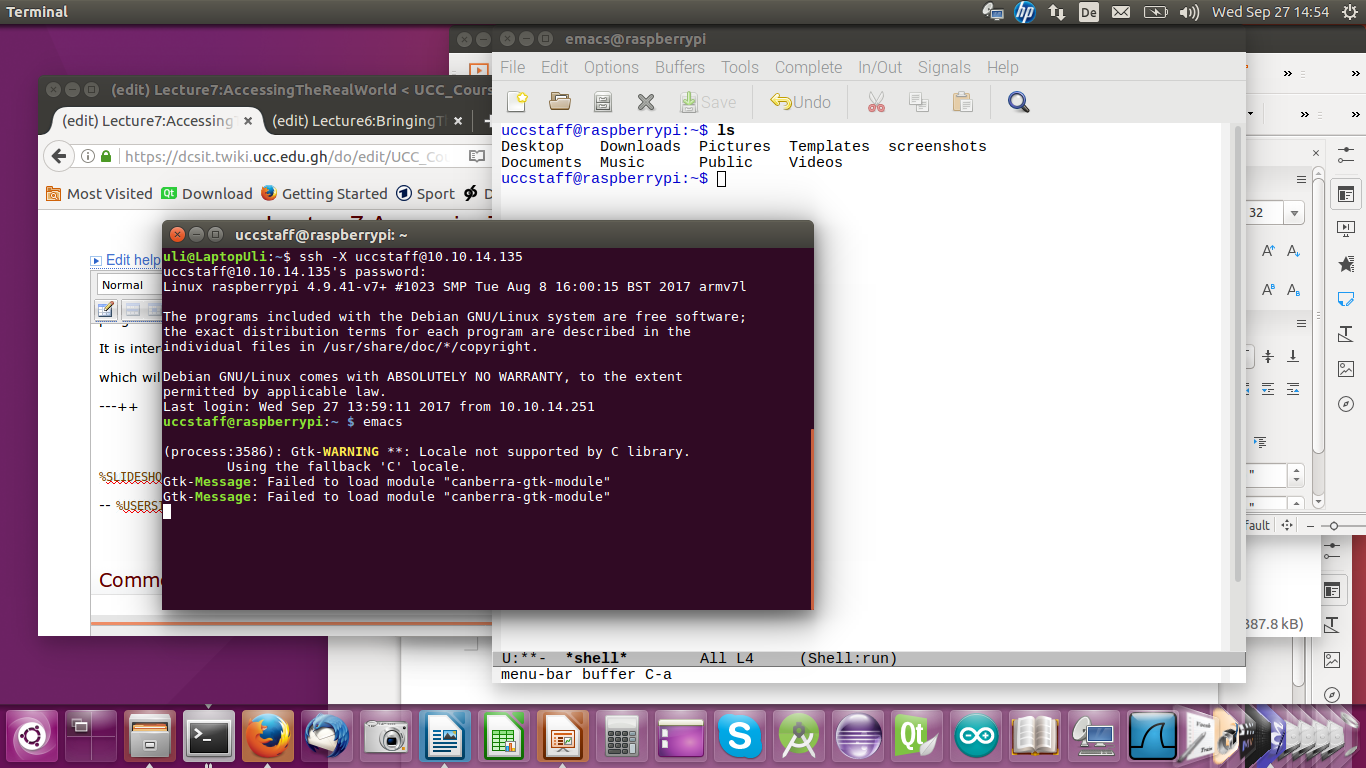
Slide 31: scp
To copy a file from the PC to the Pi this would be the command: scp myfile.c uli@rpi-10:exercises/solutions/exercise_2 This will copy the file ďmyfile.cĒ into the sub-directory exercises/solutions/exercise_2 on my home directory on the Pi. Of course user uli must exist on raspberry10. Instead of specifying the machine name: rpi-10 you can also give its IP address.Slide 32: Compiling C programs for the Raspberry Pi
Just like Linux on the PC, Linux on the Raspberry Pi uses the GNU C compiler gcc. The front end:- Lexical Analyzer
- and the parser for the grammar
Slide 33: Cross-Compilation for the Pi
As explained in a previous lecture we can also compile C programs for the Raspberry Pi on the PC Linux system using a cross-compiler. The cross compiler we will use is named arm-linux-gnueabihf-gcc and it is part of the toolsComments
| I | Attachment | History | Action | Size | Date | Who | Comment |
|---|---|---|---|---|---|---|---|
| |
cobbler.png | r1 | manage | 60.3 K | 2017-09-14 - 08:38 | UnknownUser | |
| |
dd.png | r1 | manage | 5.5 K | 2017-09-19 - 08:34 | UnknownUser | |
| |
ddProgress.png | r1 | manage | 4.4 K | 2017-09-19 - 08:34 | UnknownUser | |
| |
lecture_6.odp | r1 | manage | 1155.9 K | 2017-10-16 - 12:38 | UnknownUser | |
| |
loopMount.png | r1 | manage | 28.8 K | 2017-09-19 - 08:14 | UnknownUser | |
| |
piRemoteDesktop.png | r1 | manage | 378.8 K | 2017-10-12 - 07:35 | UnknownUser | |
| |
raspberry.png | r1 | manage | 101.0 K | 2017-09-14 - 08:38 | UnknownUser | |
| |
raspbianImage.png | r1 | manage | 31.7 K | 2017-09-19 - 08:14 | UnknownUser | |
| |
raspbianRoot.png | r1 | manage | 16.3 K | 2017-09-14 - 08:38 | UnknownUser | |
| |
raspi-config.png | r1 | manage | 74.6 K | 2017-09-19 - 08:45 | UnknownUser | |
| |
rpiGPIO.png | r1 | manage | 77.5 K | 2017-09-14 - 08:38 | UnknownUser | |
| |
rpiSpecs.png | r1 | manage | 29.9 K | 2017-09-14 - 08:43 | UnknownUser | |
| |
ssh-X.png | r1 | manage | 293.5 K | 2017-10-16 - 08:57 | UnknownUser | |
| |
whichDisks.png | r1 | manage | 7.1 K | 2017-09-19 - 08:15 | UnknownUser |
Ideas, requests, problems regarding TWiki? Send feedback


