
Slide 1: DHT11 Temperature and Humidity Sensor
Lecture 8
Uli Raich
UCC semester 2017/2018
Slide 2: A single GPIO pin
We have seen how we can drive an LED from a single GPIO pin programmed as output pin or how we can read its state through another GPIO pin, programmed as input pin.Can one do more with a single pin?
Slide 3: DHT11 pinout
| The DHT11 has only 3 pins:
Be careful: The PCB layout of the PCB board in my |
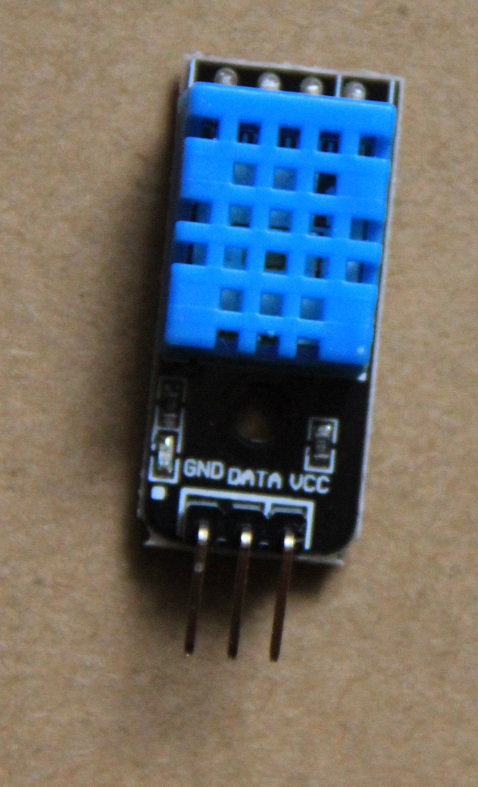 |
Slide 4: Serial Protocol
How can we, with a single pin- initiate a measurement
- read humidity and temperature data
- make sure the data are correct?
and the DHT11 implements its own serial protocol
Slide 5: Reading and understanding the data sheet
Let’s have a look at the DHT11 data sheet
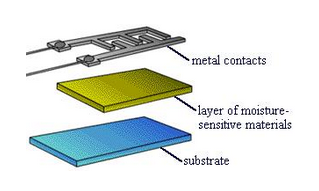
Slide 6: How does a resistive humidity measurement work?
Slide 7: Resistive Humidity Measurement(2)
- Variations in relative humidity produce changes variations
of resistivity,which is measured. - The resistance of certain hygroscopic materials such as
hygroscopic salts have such a property - These materials are mounted as thin films on
the substrate with metal contacts - The devices can be very small
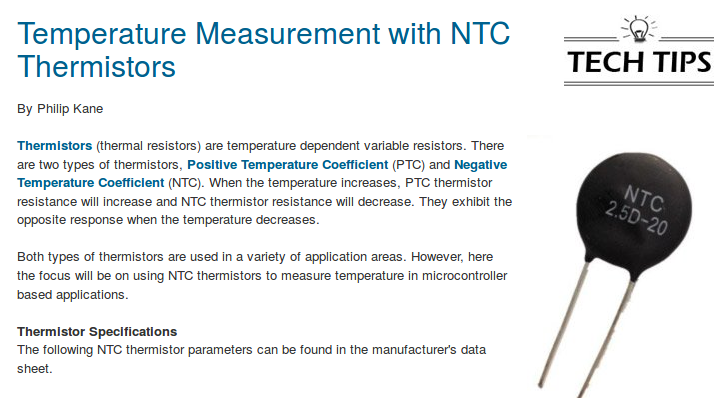
Slide 8: The NTC Thermistor
Slide 9: A processor on chip
In order to convert these measurements into numeric values and send them to the end user through a serial protocol, a preprogrammed micro-controller must be implemented on the chip. In the case of the DHT11 this is an 8 bit micro-controller, which does the conversion into binary and which creates the serial protocolSlide 10: Text from the data sheet

Slide 11: Measurement Precision

Slide 12: How to connect the device

Slide 13: Powering the device
As we can see from the specs below, the DHT11 power line can be directly connected to the cobbler 3.3V (or the 5V) line
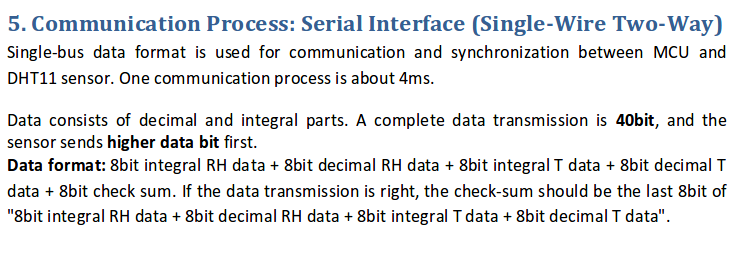
Slide 14: Single Wire two way interface
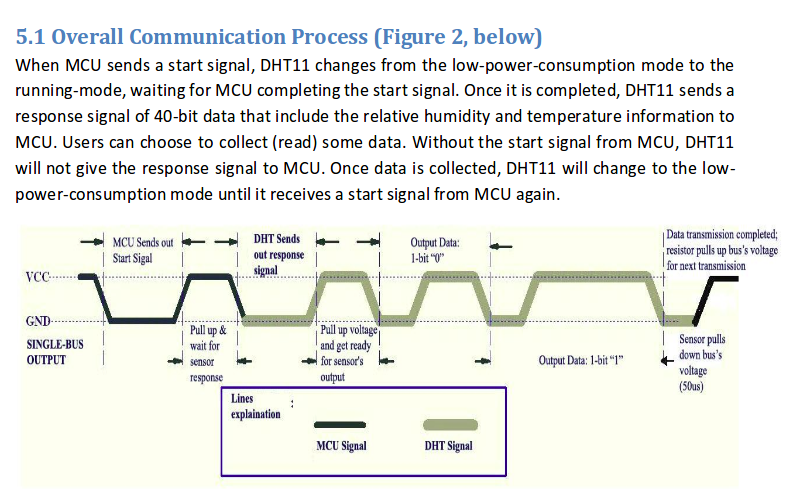
Slide 15: Overall Communication Process
Slide 16: How to initiate a Measurement?
Slide 17: What does this mean for our program?
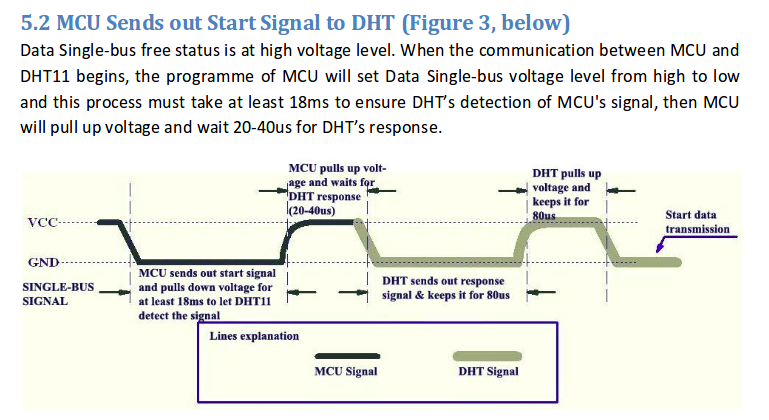
We must:- Program the GPIO pin onto which we connected our DHT11 as output
- We must pull this line done (send a login level zero) and
keep it low for a minimum of 18 ms - We must pull it high again and wait for another 20-40 μs
- Finally we must re-program the pin as input and wait for the DHT11 to respond.
Slide 18: Response from the DHT11

Slide 19: A zero bit
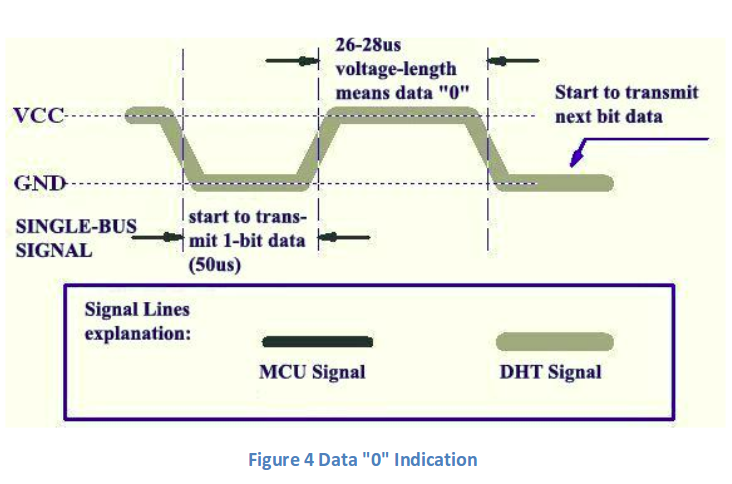
Slide 20: A one bit

Slide 21: Complicated?
Wow, this looks complicated. How can we write a program to do all this? Let's start slowly:- Initiating a measurement seems do-able
- Why not just read the data from the device every 5 µs
and print out the information?
Slide 22: What the user of the device wants
The user of the device would like to have a library which hides all these details. He wants functions to- Initialize the device
- Start a measurement
- Make sure the checksum is ok
- Read temperature and humidity values
- Maybe know when the measurement was made
Slide 23: The library
How do we write a library?A library consist of min. 2 files:
- an include file (dht11.h)
- and implementation file (dht11.c)
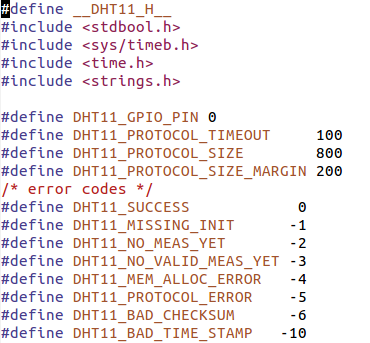
Slide 24: The include file of the dht11 library
Slide 25: dht11.h (2)
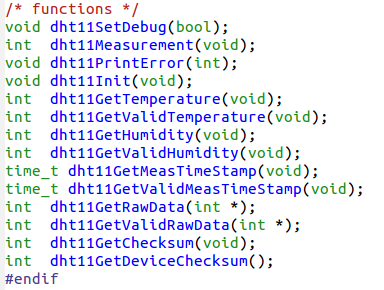
Slide 26: The library code
- dht11Init simply calls wiringPiSetup()
- dht11Measurement
- Programs the gpio pin as output and sends the start sequence
- Switches back the gpio pin to input and reads the data coming from the dht11 every 5 µs and saves the data into an array
- Analyses the data and extracts temperature, humidity and the checksum
- Calculates the checksum and compares it with the one coming from the device
- If checksums are ok, sends the data to “validData”
- Keeps the time stamp of the measurement
Slide 27: Reading the final data
- dht11GetValidTemperature()
- dht11GetValidHumidity()
- dht11getValidMeasTime()
- dht11getChecksum()
- dht11getDeviceChecksum()
Slide 28: Starting the measurement
The data pin has been programmed as output earlier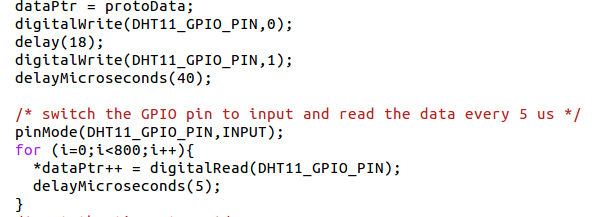 You can print these data and have a look at them with gnuplot. Try analyzing be hand.
Slide 29: Analyzing the data
This is the tricky bit and you are invited to give it a try. I have written a routine reading a single bit, which is called 40 times for all the 40 bits in the data. Please note one nasty problem:Linux is a multi-tasking system and permanently receives interrupts. While these interrupts are treated the DHT11 data are continuing to flow but are not taking into account, leading to corrupt data. Since the duration of the protocol takes ~ 4 ms the probability is non negligible and the checksum test in obligatory to make sure the data are consistent. In case of a checksum error you must repeat the measurement
Slide 30: Creating a shared library
The Makefile says it all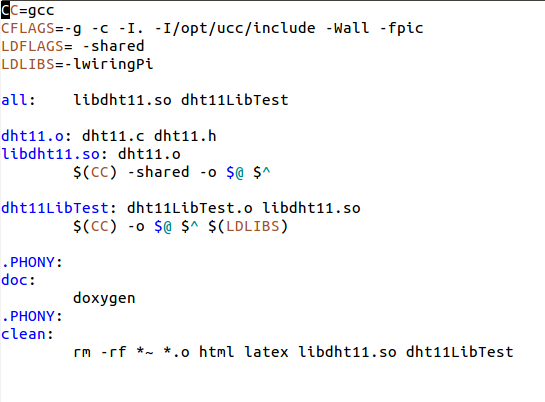
Slide 31: Where is the include file, where the binary of the shared lib?
I installed the include file in /opt/ucc/include and the library in /opt/ucc/lib. These are non-standard directories and must be declared in the Makefile -I /opt/ucc/include for the include file in CFLAGS -L /opt/ucc/lib for the library path Since the shared library is loaded separately when running the main program, it must be found by the system: export LD_LIBRARY_PATH=$LD_LIBRARY_PATH:/opt/ucc/libSlide 32: Documentation
When writing a library that is supposed to be used by other people, documentation is of utmost importance Of course the function prototypes in the include file give some indication but this normally not enough. I use the doxygen in code documentation system which allows to generate documentation from the source layout and comments in the code with special tags. It creates html of latex doc--
Comments
| I | Attachment | History | Action | Size | Date | Who | Comment |
|---|---|---|---|---|---|---|---|
| |
connections.png | r1 | manage | 42.6 K | 2017-10-20 - 16:27 | UnknownUser | |
| |
dht11.png | r1 | manage | 597.9 K | 2017-10-20 - 16:34 | UnknownUser | |
| |
dht11H-1.png | r1 | manage | 24.8 K | 2017-10-23 - 13:47 | UnknownUser | |
| |
dht11H-2.png | r1 | manage | 22.3 K | 2017-11-01 - 08:05 | UnknownUser | |
| |
dht11H-2v2.png | r1 | manage | 22.3 K | 2017-11-01 - 08:05 | UnknownUser | |
| |
dht11Intro.png | r1 | manage | 26.5 K | 2017-10-20 - 16:27 | UnknownUser | |
| |
dht11Specs.png | r1 | manage | 11.5 K | 2017-10-20 - 16:27 | UnknownUser | |
| |
humiCalib.png | r1 | manage | 24.3 K | 2017-10-20 - 16:27 | UnknownUser | |
| |
initiate.png | r1 | manage | 153.8 K | 2017-10-20 - 16:27 | UnknownUser | |
| |
lecture_8.odp | r1 | manage | 1715.1 K | 2017-11-01 - 09:25 | UnknownUser | |
| |
measurement.png | r1 | manage | 29.9 K | 2017-10-23 - 13:55 | UnknownUser | |
| |
ntcThermistor.png | r1 | manage | 80.6 K | 2017-10-20 - 16:27 | UnknownUser | |
| |
one.png | r1 | manage | 149.6 K | 2017-10-20 - 16:27 | UnknownUser | |
| |
overall.png | r1 | manage | 180.3 K | 2017-10-20 - 16:27 | UnknownUser | |
| |
power.png | r1 | manage | 14.5 K | 2017-10-20 - 16:27 | UnknownUser | |
| |
resistiveHumiMeas.png | r1 | manage | 54.9 K | 2017-10-20 - 16:27 | UnknownUser | |
| |
response.png | r1 | manage | 28.8 K | 2017-10-20 - 16:28 | UnknownUser | |
| |
shareLib.png | r1 | manage | 27.9 K | 2017-10-23 - 14:25 | UnknownUser | |
| |
twoWay.png | r1 | manage | 32.0 K | 2017-10-20 - 16:28 | UnknownUser | |
| |
zero.png | r1 | manage | 181.6 K | 2017-10-20 - 16:28 | UnknownUser |
Ideas, requests, problems regarding TWiki? Send feedback


