Measuring temperature and humidity
Goal:
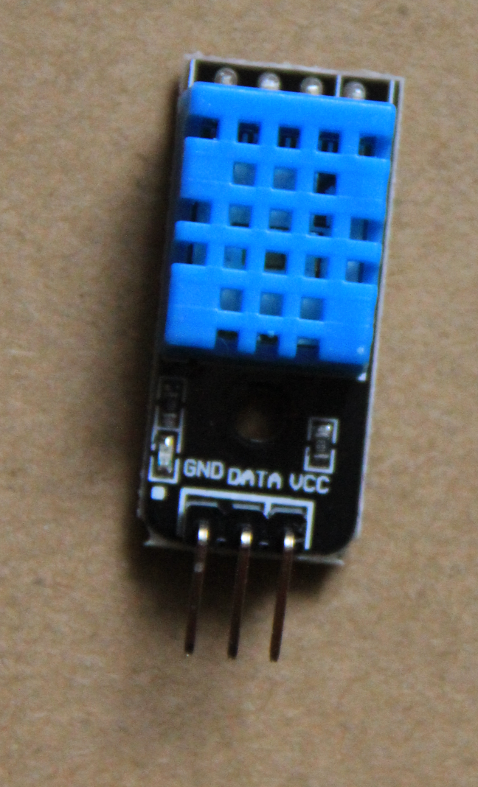
The DHT11 is a low lost humidity and temperature sensor using its own serial protocol for data transfer. While for 1-wire devices like the ds18B20 temperature sensor a device driver for Linux is available as a kernel module and all the intricacies of the protocol are handled within this module, such a device driver is not available for the DHT11. The goal of this exercise is therefore to read and understand the DHT11 data sheet Be careful: The PCB on which the DHT11 is mounted in our sensor kit is cabled differently:
Looking onto the device like in the photo, the signal pin is left, labeled "S" (where the GND pin is on my DHT11), the Vcc pin is in the middle and the GND pin is right!
Exercise 1: Using a shared library
In order to simplify matters for you I wrote a few functions collected in a shared library. These are the calls available to you:-
int dht11Init(void);
-
void dht11SetDebug(bool);
-
int dht11Measurement(void);
-
int dth11GetValidTemperature(void);
-
int dth11GetValidHumidity(void);
-
int dht11GetValidRawData(int *);
-
int dht11GetChecksum(void);
-
int dht11GetDeviceChecksum();
-
time_t dht11GetValidMeasTimeStamp(void);
Exercise 1: Data taking
Carefully read the DHT-11 data sheet and fully understand the way the DHT-11 communicates with its host micro-controller. Connect the DHT-11 to Vcc and ground and connect the data pin to gpio pin 0 (see warning above!) Write a C program to drive the data pin in such a way that the data transfer is initiated. Then program the gpio pin as input and read the data repetitively every 5 micro seconds. Save the data into an integer array (even though the data will only vary between 0 and 1). Use a pointer to take as little time as possible to transfer the data into the array. Finally print the data read onto stdout and redirect the output onto a file. How big must the data array be to hold all data in the worst case where only 1s are transmitted?Exercise 2: Manual Data Analysis
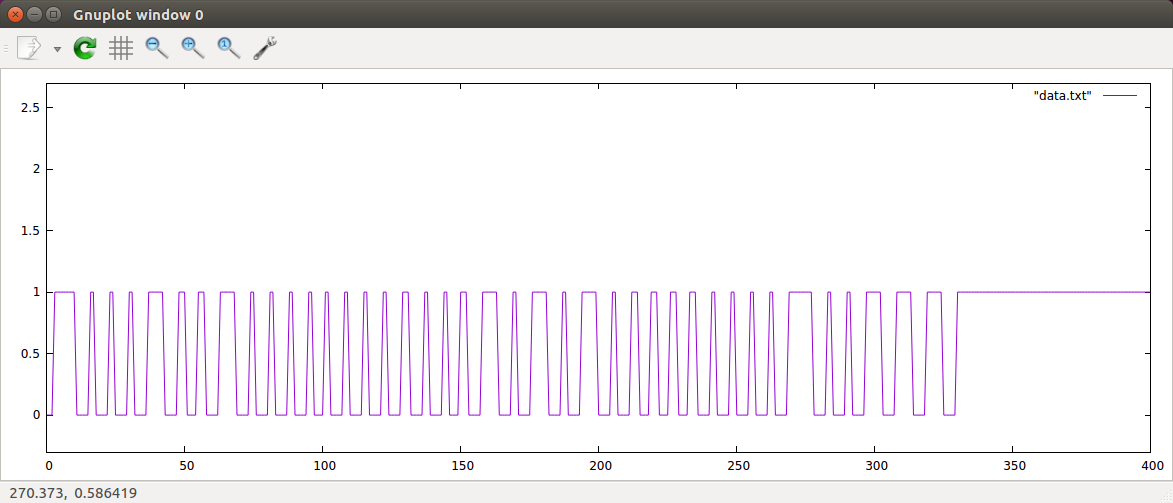
Use gnuplot to plot the acquired data. Analyze the data and extract the values for temperature, humidity and checksum by hand. Calculate the checksum over the temperature and humidity data and compare the result to the expected value sent by the DHT11. Use hexadecimal calculus to do this. A typical bit stream transmitted by the DHT11.
Exercise 3: Analysis done by program
Read in the acquired data through stdin and print them (I/O redirection from the file). Then analyze the pulse train and extract the temperature and humidity data. Use shift and or instructions to build up the 8 bit values for temperature and humidity. Calculate and compare the checksums. Print the results. Finally connect the data acquisition and the data treatment programs through a pipe.Comments:
Of course it is also possible to treat the data on the fly during data taking (you may want to give it a try!) However in this case debugging is more difficult due to real time constraints. You cannot put print statements into the code for debugging because the DHT-11 will not wait until your debugging print has finished. If you separate data taking and data analysis, the debugging becomes much easier because you have plenty of time to look at the data.Python
For those of you who prefer Python, I have written a Python class to access the dht11 and a small example program creating an instance of this class and using it to take measurements and printing the result. Since my programming experience in Python is very restricted (just 4 days!) please don't be too critical with my code. It seems to work though. https://afnog.iotworkshop.africa/pub/Embedded_Systems/TemperatureHumidity/dht11Class.py.txt https://afnog.iotworkshop.africa/pub/Embedded_Systems/TemperatureHumidity/dht11Example.py.txt--
Comments
| I | Attachment | History | Action | Size | Date | Who | Comment |
|---|---|---|---|---|---|---|---|
| |
dht11.odt | r1 | manage | 58.9 K | 2017-10-25 - 18:54 | UnknownUser | |
| |
dht11.pdf | r1 | manage | 93.6 K | 2017-11-27 - 10:35 | UnknownUser | |
| |
dht11.png | r1 | manage | 597.9 K | 2017-10-25 - 16:12 | UnknownUser | |
| |
dht11Class.py.txt | r1 | manage | 7.5 K | 2017-11-29 - 11:07 | UnknownUser | |
| |
dht11Data.png | r1 | manage | 38.7 K | 2017-10-25 - 16:12 | UnknownUser | |
| |
dht11Example.py.txt | r1 | manage | 0.7 K | 2017-11-29 - 11:07 | UnknownUser |
Ideas, requests, problems regarding TWiki? Send feedback


