Exercise 4: The DHT11 Temperature and Humidity Sensor
Introduction
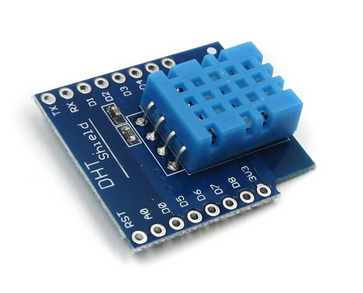
The DHT11 is a digital temperature and humidity sensor featuring its own proprietary communication protocol. It uses a single GPIO line (GPIO 16) to serially transfer its temperature and humidity measurement. MicroPython already has a driver for the DHT type sensors (DHT11 and DHT22) included in its binary making it very easy to read the temperature and humidity values. The driver however hides the protocol from the user and the student cannot see what is going on behind the scene.
For this reason I have added a second driver allowing to read raw bit values as they appear in the DHT11 protocol. This allows the student to understand how the DHT11 actually works and what the driver is doing to extract the temperature and humidity values.
This driver (module dht11Raw) starts a measurement on the DHT11 and then scans the DHT11's data line every 4 us keeping its state in a 32*32 bit array. The first measured bit is the highest significant bit of the first array element and the last measured bit is the lowest significant bit of the last element in the array.
Here is the DHT11 data sheet:
https://afnog.iotworkshop.africa/pub/IoT_Course_English/TheDHT11TemperatureAndHumiditySensor/DHT11.pdf
Please read it carefully!
Exercise 1: The DHT11 using the MicroPython driver
Write a script which reads out thee DHT11 and prints its temperature and humidity values. As mentioned in the introduction, the DHT11 is connected to the ESP32 through GPIO pin 16. The description of the MicroPython driver is found in the !MicroPython documentationExercise 2: Understanding the DHT11 protocol
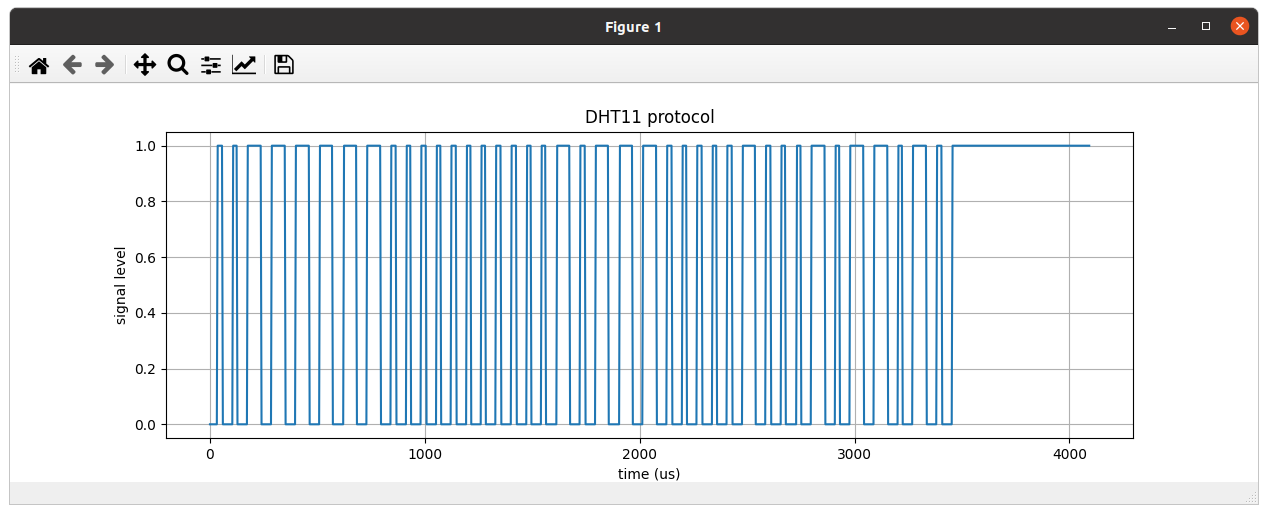
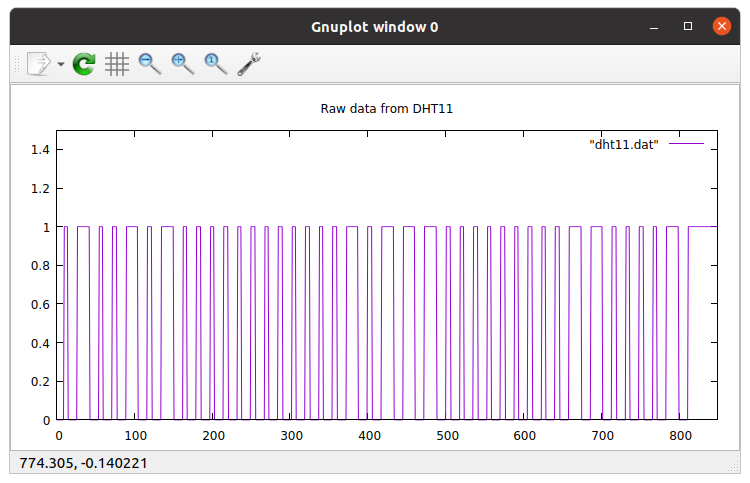
The screen dump below shows the raw data from a DHT11 measurement. Try to extract temperature and humidity from this measurement, calculate the checksum and compare it to the one transmitted in the protocol. Once you managed to get at the data manually, write a script dht11Eval.py which extracts the data automatically and prints it. You may use this file:
https://afnog.iotworkshop.africa/pub/IoT_Course_English/TheDHT11TemperatureAndHumiditySensor/dht11.txt
as input data or you proceed to the next exercise first and you produce your own data sample.
Exercise 3: Getting the Raw Data
Get at the raw data and write them to a file on the ESP32. The dht11Raw module has a single function: dht11ReadRaw(pin,dht11Data) The data must be an integer array with 32 integer values. You can create this with: import arraydht11Data = array.array("I",[0]*32) which creates the needed array and fills it with zeros. Once have the data, you must write them in a suitable format to a file on the ESP32. In my solutions I write them to a file named "/data/dht11.txt". Before writing I check if the "/data" directory exists. You can do this with a try/except clause using the system call uos.stat('/data'). This will raise an OSError with error number ENOENT if the directory does not exist. (Have a look in the uerrno module). In this case you can create it with uos.makedir('/data'). Write the data in hex text format with 8 hex characters per integer number. Here an example:
 There are essentially two ways on how to accomplish the formatting such that the data can be easily read, both nicely described in https://pyformat.info
Exercise 4:
Extract the individual bits from the raw data of exercise and write them to an "uncompressed file". Each data entry will contain either 0 or 1. You may also plot the data directly from within you Python program using matplotlib
Comments
| I | Attachment | History | Action | Size | Date | Who | Comment |
|---|---|---|---|---|---|---|---|
| |
DHT11.pdf | r1 | manage | 1483.2 K | 2020-05-14 - 07:50 | UliRaich | |
| |
dht11.txt | r1 | manage | 0.4 K | 2020-05-14 - 13:29 | UliRaich | |
| |
dht11Data.png | r1 | manage | 10.3 K | 2020-05-14 - 12:11 | UliRaich | |
| |
dht11DataPlot.png | r1 | manage | 86.4 K | 2020-05-14 - 13:21 | UliRaich | |
| |
dht11Gnuplot.png | r1 | manage | 39.2 K | 2020-05-14 - 12:38 | UliRaich | |
| |
exercise_4.odt | r1 | manage | 275.2 K | 2020-08-09 - 08:52 | UliRaich | |
| |
gnuplotData.png | r1 | manage | 2.7 K | 2020-05-14 - 13:05 | UliRaich | |
| |
wemosDHT11.png | r1 | manage | 113.4 K | 2020-05-14 - 07:41 | UliRaich |
Ideas, requests, problems regarding TWiki? Send feedback


